When you eat a bran muffin, brown rice, or whole wheat bread, you think you’re making a healthy choice, right? Well, because of the phytic acid present in these foods, that is not the case. If you are not going to properly prepare your foods that contain phytic acid, it is actually a better option to eat a blueberry muffin made with white flour, white rice, and white bread.
Phytic acid is present in all seeds (which by definition includes nuts, beans, grain, oats, rice, corn, tubers, etc.), and is an anti-nutrient that protects plants, but is harmful to us if we eat it in its raw state. In order to unlock the phytic acid so that we can get the phosphorus within and prevent it from leeching additional nutrients from us, we need to unlock the phytase within the seed (or add it if enough isn’t there). We can do this by using proper preparation techniques such as soaking, sprouting, and sour leavening.
What is an Anti-Nutrient?
There are many different types of anti-nutrients such as protease inhibitors, lipase inhibitors, amylase inhibitors, oxalic acid and oxalates, glucosinolates, trypsin inhibitors, lectins, flavonoids, and saponins, and they are all good for plants, but bad for us. Basically, they are the protection system of plants. They are found most often in the hull or husk of a seed and acts as a protective coating that can be “taken off” when the conditions (for growing) are just right.

This Coat is Like the Anti-Nutrients in a Plant

Taking the Anti-Nutrient “Coat” Off
Phytic Acid is an Anti-Nutrient
Phytic acid is the specific anti-nutrient that I want to focus on here because it is prevalent in so many of our foods, and by properly preparing foods to unlock the phytic acid, we will also be unlocking the mechanisms of some of the other anti-nutrients as well.

Phytic Acid is an Anti-Nutrient (Photo Credit: Wikimedia Commons, Harbinary, 2009)
Good for Plants: When a seed is in conditions that are just right for growing (the right acidity or soil pH, enough moisture, and nutrients are present), phytase will be released that will unlock the phytic acid and release the phosphorus that it needs to grow. Because of phytic acid, seeds can stay dormant as they pass through the digestive tract of an animal and are in locations or conditions where the growing conditions are not ideal. Soil has a specific pH that when combined with water and nutrients unlocks the phytic acid so the seed can germinate and grow.

A Seed is Protected by Phytic Acid Until it Sprouts (Photo Credit: Wikimedia Commons, Amada44, 2010)
Bad for Us: We have enzymes to break down fats, proteins, and carbohydrates, but we do not have an enzyme that allows us to break down phytic acid. So when we eat foods with phytic acid, we are not getting access to the valuable phosphorus inside. Phosphorus isn’t as widely recognized as calcium, but it is just as important. Phosphorus is a mineral found within every single cell in the body. It works with calcium to make our bones strong. Too little phosphorus in the diet can lead to osteoporosis. (*Too much, mainly from soft drinks, can lead to calcium loss as well as cravings for sugar and alcohol.)
In addition, the phosphate arms of the phytic acid molecule attach to valuable minerals such as calcium, iron, zinc, and magnesium, making it impossible for us to absorb them during digestion. (It binds with these minerals regardless of when they were consumed, meaning that by eating phytic acid, we could actually be getting negative nutrients from the food we’re eating.) Phytic acid also inhibits the enzymes amylase, pepsin, and trypsin that help us to digest carbohydrates and proteins.

Over Time, Phytic Acid Can Cause Osteoporosis (Photo Credit: Wikimedia Commons, BruceBlaus, 2013)
When growing children are deprived of these minerals, their growth is stunted and the results can be severe such as poor bone growth, short stature, rickets, narrow jaws, and tooth decay. As adults, we can go for years and years consuming a diet high in phytic acid and not notice any immediate damage until we get something like osteoporosis in our later years when it is too late to do anything about it.
Seeds That Have Phytic Acid
The following list of “seeds” contain phytic acid and are listed from the highest phytic acid content to the lowest. When we eat these foods, some of them easily come to mind as seeds and with others, you’ll be like, oh yeah, I guess those are seeds! (Just know that for the duration of this article, I’ll be referring to the following as seeds.)
- Seeds (like sesame and pumpkin)
- Nuts (like pecan, walnut, and peanut)
- Grains (like wheat, rye, barley, rice, and corn)
- Beans (like kidney, soy, and chickpeas)
- Tubers (like yams, sweet potatoes, and potatoes)
Phytic Acid is Located in the Hull of the Seed

Phytic Acid is in the Hull (Photo Credit: Wikimedia Commons, Laghi.l, 2007)
Phytic acid is mostly found in the bran, hull, or the hard outer layers of the seed. You would think that we would just be able to remove it and problem solved, but when we separate the bran, we are also separate the embryo, and these two places are where all of the nutrients are located.
What Will Neutralize the Phytic Acid?
Phytase is an enzyme that resides within plants alongside phytic acid that neutralizes it and unlocks the organic form of phosphorus by acting as a catalyst to the hydrolosis of phytic acid. In nature, this occurs during germination.
Where Do We Get Phytase?
Ruminant animals such as deer, cows, and sheep, produce phytase that helps them to unlock the nutrients in the phytic acid. They also have four stomachs, regurgitate their food so they can chew it again, and have longer intestines. They are made to eat food like this.

Ruminant Have Four Stomachs that can Break Down Phytic Acid (Photo Credit: Wikimedia Commons, Pearson Scott Foresman, 2008)
We are not. We produce such a small amount of phytase that it’s hardly worth mentioning. Some people do have really good gut flora with probiotic lactobacilli and other good bacteria that actually produce phytase. They are able to handle low to moderate amounts of phytic acid.
But here’s the good news: By soaking, sprouting, and sour leavening, we can mimic the conditions that stimulate germination which will release the phytase and break down the phytic acid thereby releasing the phosphorus mineral and unlocking any other minerals (calcium, zinc, magnesium, and iron) that are bound up as well.
Organic Chemistry
This might be a section that you gloss over, and that’s fine. Just know that I have spent weeks upon weeks and hours upon hours reading hundreds of pages of studies and scientific explanations in order to understand this very complicated, yet beautifully simple, process. Here is what I learned about phytic acid and how it is affected by the three things that seeds need to germinate.
- The Right Moisture: The first thing seeds need to germinate is water, or H2O.
- The Right Acidity: When the pH reaches the optimal level of 5.1-5.5, which is slightly acidic, the phosphates in the phytic acid (where the phosphorus is being stored) convert to dihydrogen triphosphate ions (H2PO4−). This is when the phytase that is in the seed catalyzes (or starts a reaction with) the hydrolysis of phytic acid. Hydrolysis is a reaction involving the breaking of a bond in a molecule using water. So basically, when the conditions are slightly acidic, the phytic acid is able to be broken apart with the help of the phytase enzyme.
- The Right Nutrients: Now that the phosphates have been released from their phytic acid bond, the seed can access the phosphorous which it uses to sprout and grow. When the seedling sprouts, the phytase levels are at their highest and they phytic acid levels are at their lowest.
Kitchen Chemistry: Soaking, Sprouting, and Sour Leavening
Once we understand the organic chemistry behind germination, we can understand the chemistry that needs to take place in our kitchen. In order to break down the phytic acid and unlock the nutrients that are trapped within, we need to mimic the process of germination.
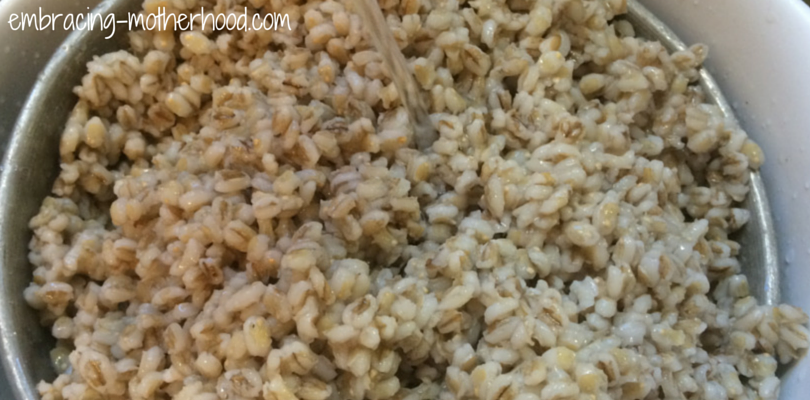
- Soaking in an Acidic Medium: Soaking is what prepares the seed for germination. By adding an acidic medium such as whey, buttermilk, yogurt, or clabbered milk, which creates an optimal pH level of about 5-5.5 where the phytic acid will be able to be broken down. Apple cider vinegar has a slightly lower pH of 3 and lemon juice is the most acidic of all with a pH of 2. By adding a few tablespoons of either of these to a large pot or glass container of filtered water (never plastic), it should be diluted enough to create a slightly acidic medium. Soaking works best when it’s warm (about 90 degrees) and when it lasts for at least 24 hours.

Soaking Barley in an Acidic Medium
- Sprouting: Seeds that are soaked in filtered water and then sprouted for 4 to 5 days will have the time to neutralize a good amount of the phytic acid. Sprouting also increases the vitamin C content tremendously! I personally find the sprouting process too time consuming, but give it a try if it sounds like fun to you or you can buy some sprouted grain flour here!
 [GFDL (http://www.gnu.org/copyleft/fdl.html) or CC BY-SA 3.0 (http://creativecommons.org/licenses/by-sa/3.0)], via Wikimedia Commons")
Seeds Sprouting (Photo Credit: Wikimedia Commons, Alex Ex, 2007)
- Sour Leavening: Sourdough creates the perfect pH of 4.5-5.0. This is the BEST way to get rid of ALL the phytic acid. Not only that, but the naturally occurring lactobacilli bacteria that convert lactose and other sugars into the lactic acid that gives it its perfect pH, are also the good bacteria that you want in your gut to crowd out things like candida. When making sourdough, it is important to work with freshly ground grain so that the phytase is readily available. Check out some of my sourdough recipes if you are ready to get started.

Sourdough Starter
Some Seeds Don’t Have Phytase
In order for the phytic acid to be broken down, there MUST be phytase within the seed. If there isn’t, no amount of soaking, sprouting, or fermenting will break down the phytic acid. Rye, wheat, and barely, for example, have high amounts of phytase. Oats, rice, and corn, however, have hardly any phytase at all. Here’s a simple trick you can do for seeds that don’t have enough phytase.
- Grind some fresh grain that is high in phytase. (Rye is the best, wheat works too.)
- Add one or two tablespoons during the soaking process to seeds that are low in phytase.
- *The grain MUST be ground fresh (which is why I would recommend buying a little coffee grinder to keep on your kitchen counter) and cannot be frozen or stored for a long time (the phytase will no longer be active.)
- The added phytase will break down the phytic acid and your precious nutrients will be unlocked.
Preparation Tips and Tricks
If you’re ready to start getting rid of phytic acid, here are some tips and tricks to use with seeds that have a lot of phytase (like rye, wheat, and barely), seeds that have very little phytase (like oats, rice, and corn), and seeds that are in kind of a grey area (like tubers, beans, nuts, and seeds).
Seeds with Plenty of Phytase
Rye, wheat, and barley are high in phytase. This means that when properly prepared, they can break down their own phytic acid.
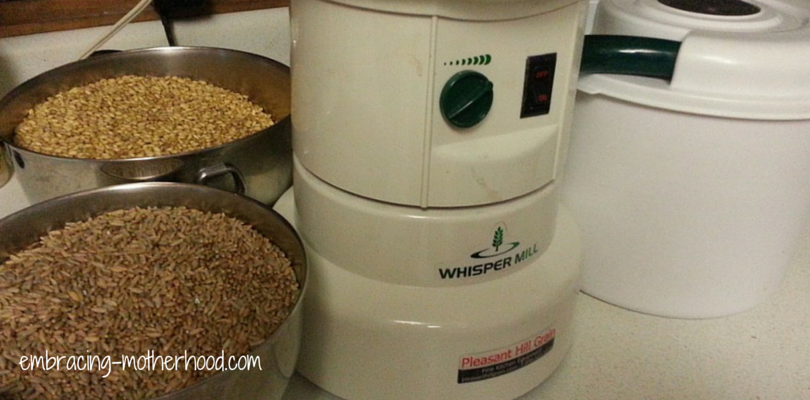
Making Flour: I love grinding my own grain to make bread or any other recipies. Freshly ground flour has all of the active phytase and all of the vitamins and minerals intact. The heat of industrial grinding destroys the phytase along with many of the nutrients. Combine that with a long shelf life and buying whole wheat flour is just an empty gesture. Even grinding grain fresh and keeping it in the freezer destroys the phytase.
The best thing to do is to freshly grind what you are going to use. That is why I like keeping my WonderMill within easy reach in the kitchen. I know the price tag seems like a lot, so if you don’t have one yet, maybe you’ll want to try a hand grinder for a lot less to see if you like it first. For grinding small batches of grain to add to my sourdough and other recipes, I like using this little coffee grinder. *Post update (January 2016): After I grind my wheat, I just leave it in its container and keep it on the countertop to use as needed.
I have found that sourdough is the best way to eliminate pretty much all of the phytic acid. Soaking grains before grinding them to make flour just doesn’t make sense to me, and sprouting is a LOT of work and won’t get rid of all they phytic acid, but it’s an option if you’re interested. You can soak your flour in an acidic medium after it’s freshly ground and it should do a pretty good job of getting rid of the phytic acid as well.
- Rye – Rye grains have the most phytase of any seed. They have 14 times more phytase than wheat grains. This is the recommended grain for making bread because of its high phytase content, but I have tried using it to make my sourdough and it didn’t rise very well. It tastes great, but it’s a very dense grain. I prefer keeping some on hand to grind fresh to add to other seeds that don’t have as much phytase.

Rye Grains (Photo Credit: Wikimedia Commons, Agronom, 2013)
- Wheat – Wheat grains don’t have as much phytase as rye, but they have enough to do the job. I find that the lighter grains like Organic Prairie gold wheat berries are the best for making sourdough bread. You can also use something similar like this Soft Winter Wheat or some ancient Einkorn grains. It may seem like a lot to buy 50 lbs at a time, but it is the most cost effective way to get your grains if you have the place to store them. I just keep them in a cupboard in the bag it comes in and roll it down when I’m not using it, but you can get some 5 gallon buckets from the hardware store that would work great too. If you don’t feel like grinding your own grain, here’s a good alternative. Sifting your freshly ground flour to take out the big chunks of bran can help too.

Wheat Grains: High in Phytase
- Barley – Barley is more of a superfood than you think. It has an impressive nutritional profile with 23 g of protein per serving (way more than beans or rice) with more vitamins and minerals than just about any other grain. Barley grains have the same amount of phytase as rye grains, so before I use them in my soups, I soak them for 24 hours in an acidic medium. I also order them in bulk from CLNF, but you can also buy them here. I like to get the hulled kind, but if you don’t want to soak them and you don’t care about the nutrient profile, then you can get the pearl kind.

Barley Grains: High in Phytase
Seeds with Very Little Phytase
Oats, rice, and corn have very little phytase, so they will need a little help to break down the phytic acid. By adding a few scoops of freshly ground phytase rich rye flour (or wheat) to an acidic soaking medium, and soak for a full 24 hours, a good amount of the phytic acid should be broken down.
- Oats – Oats have more nutrients than just about any other grain. Organic rolled oats are the best because part of the bran (where the phytic acid is) is removed during the rolling process. Just stay away from instant rolled oats because they have been subjected industrial processing with such high heat that nearly all of the nutrients have been destroyed. I used to like steel cut oats, but they have an extremely high phytic acid content. If you prepare them properly, you might be able to get rid of about half of the phytic acid.

Steel Cut Oats: Very Little Phytase
- Rice – Brown rice isn’t as healthy as you would think. It only has 5 g of protein per serving in comparison to barley’s 23 g and more impressive nutrient profile. I much prefer using barley in my soups over rice. In addition, studies have shown there to be concerning amounts of arsenic in rice, especially in brown rice. In our family, we enjoy organic jasmine or basmati rice from time to time as a vehicle for other healthier foods like salmon and stir fry.

White Rice: Very Little Phytase
- Corn – Are you surprised to see that corn is a grain instead of a vegetable as it’s often peddled? Well, because corn is such a genetically modified food, we try to stay away from it anyways unless it’s in season and we can buy it fresh from a local farmer. Otherwise, we might enjoy some organic corn chips as a vehicle for other more healthy foods like my homemade tacos on occasion. You can get these sprouted organic corn tortillas in bulk here, and here’s a recipe for some fermented corn bread that sounds pretty good if you’d like to still include corn in your diet in a safe way.

White Popcorn Kernals: Very Little Phytase
Kind of a Grey Area…
All of the seeds in this category are kind of hard to define, but the one thing they have in common is that they should NOT comprise the majority of the calories in your diet. Many people will turn to things like nut flours (including coconut) if they trying to go grain free, but here’s a look into why that’s not such a good idea.
- Nuts – Nuts have phytic acid amounts equal to or greater than that of grains, but unfortunately we know very little about how to reduce phytic acid in nuts. If you soak them, you might be able to get rid of some of the phytic acid, but not much. A handful of nuts here and there should really be of no concern, but watch out for things like almond milk, nut flours, and peanut butter. You can buy nut butters that have been soaked, and that is a better option.

Mixed Nuts: Very Little Phytase
- Seeds – Seeds are extremely high in phytic acid. Some of the phytic acid may be removed by soaking, sprouting, and/or roasting, but it’s debatable. It is best to keep seeds to a minimum and to avoid snacking on raw seeds. If you want to buy some that are okay for occasionally snacking on, you might want to check out these organic sprouted pumpkin seeds.

Seeds: Extremely High in Phytic Acid (Photocredit: Wikimedia Commons, Jitujetster, 2009)
- Cacao Seeds – Oh, and here’s some bad news: cacao is a seed, and it is extremely high in phytic acid. Do you know what that means? That’s right, chocolate is made from cacao seeds and is therefore high in phytic acid. Boo! The best thing to do is look for raw cocoa and cocoa powder that is fermented. Maybe I’ll have to give some of these a try.

Cacao Seeds (Photo Credit: Wikimedia Commons, Fæ, 2013)
- Beans – Do you ever get gas after eating beans? That’s probably because they weren’t prepared correctly. If you soak beans for 24-36 hours in an acidic medium with some added phytase from some freshly ground rye flour, change the water at least once, rinse the beans, add fresh water, cook at a low boil for 4-12 hours, and skim the foam that comes to the top (those are the phytates and other anti-nutrients), you can get rid of about 50% of they phytic acid. If you want to get rid of ALL the phytic acid, you’ll have to soak for 12 hours, germinate for 3-4 days, and then ferment them.

Beans: High in Phytic Acid (Photo Credit: Wikimedia Commons, BetacommandBot, 2007)
- Coffee Beans – Ready for some bad news? Coffee beans are BEANS! Therefore, they contain phytic acid too. According to research, espresso is the best way to get your caffeine kick while minimizing the phytic acid content. Here are some good espresso beans to get you started.

These Espresso Beans are the Best Way to Get Caffeine (Photo Credit: Wikimedia Commons, Ailura, 2015)
- Tubers – The Weston Price article, “Living with Phytic Acid,” explains that white potatoes and yams have phytic acid levels similar to that of white rice and that sweet potatoes have little to no phytic acid at all. Cooking doesn’t really do anything to break down the phytic acid that is present, but since the levels are so low, if you’re eating a nutrient dense diet, I don’t think it’s really a concern. Tubers are really high in potassium, so I think organic potatoes are an excellent addition to any diet (Unless you’re on a keto diet!).

Potatoes: Very Little Phytic Acid
Benefits of Phytic Acid
There are some health benefits to phytic acid that are worth taking a look at. First of all, it can be beneficial for detoxification because even though it is binding with needed minerals such as zinc and iron, it is also binding with unwanted toxic metals such as cadmium and lead and ushering them out of the body. And when phytic acid binds to excess iron (which never comes from animal products by the way, only plants) that can oxidize and form a rusting in the body, it is serving as antioxidants against cancer, heart disease, diabetes, and neurodegenerative diseases such Alzheimer’s, Parkinson’s, and ALS. But instead of buying inositol hexaphosphate or IP6 (the scientific names of phytic acid) as a supplement, just know that if you’re looking to detoxify your body because of illness or some other ailment, you can just eat a bowl of plain old brown rice to help flush out your body.
In Conclusion
There is a big misconception in a lot of health circles that if it comes from nature and it’s minimally processed, that it is the best and healthiest option.
Phytic acid is just one the many anti-nutrients out there, and its negative effects such as trapping phosphorus, leaching important minerals such as calcium, iron, magnesium, and zinc, and inhibiting the enzymes amylase, pepsin, and trypsin that help us to digest carbohydrates and proteins, should be enough to make us think twice about the seeds (grains, nuts, beans, seeds, and tubers) that we eat.
It therefore stands to reason that the “Eat food. Not too much. Mostly plants.” axiom by Michael Pollan (Omnivore’s Dilemma) isn’t the simple solution we should be looking for. If we are to keep these foods in our diets, however, it is important that we take the steps to prepare them properly in order to degrade these anti-nutrients as much as possible. By learning (or re-learning) the ancient arts of soaking, sprouting, and sour leavening, we can take steps to ensure the best nutrition not only for us, but for our children, and for our future.
Resources
-
Be Kind to Your Grains…And Your Grains Will Be Kind To You by Sally Fallon and Mary G. Enig, PhD (Mary Enig is my hero, and this article really sums up my feelings on grains nicely.)
- Nourishing Traditions by Sally Fallon, president of the Weston A. Price Foundation (This is the book that changed my life and inspired me to learn as much as I could about feeding my family. It is full of hundreds of nourishing recipes.)
-
Preparing Grains, Nuts, Seeds and Beans for Maximum Nutrition by Ramiel Nagel via the Weston Price Foundation website (My research on phytic acid originally brought me here, and while Nagel brings up some good points and has really shaken up the health circuits with some of his claims, he’s a little off in some places.)
-
Disable phytic acid with phytase and decrease whole grain toxicity by Ramiel Nagel via Natural News (This is a shorter and easier to read version of Nagel’s original article.)
-
Phytates and phytic acid. Here’s what you need to know. by Ryan Andrews via Precision Nutrition (This is a great site to check out to see the exact amounts of phytates in certain foods.)
-
Phytic Acid in Cereal Grains: Structure, Healthy or Harmful Ways to Reduce Phytic Acid in Cereal Grains and Their Effects on Nutritional Quality (This is a very scientific and probably over your head publication, but full of everything you ever wanted to know about phytic acid and phytates. It seems like this is the original research that Ramiel Nagel references in his article. I synthesized a lot of information from this article for my article.)
-
Types of Oats by The Whole Grain Council (This is a great visual and written explanation of the different types of oats available.)
-
The Surprising, All-Natural Anti-Nutrients and Toxins in Plant Foods by Kaayla Daniel via the Weston A. Price Foundation Website (If you want to learn more about anti-nutrients, this is an excellent article.)
- Why Grains Are Unhealthy by Mark’s Daily Apple (A great look at the other anti-nutrients found in grains and good explanation as to why plants have phytates and phytic acid.)
-
Phytate: impact on environment and human nutrition. A challenge for molecular breeding (A great scientific study. I loved it. Not light reading though!)
-
Lactic Acid and Thermal Treatments Trigger the Hydrolysis of Myo-Inositol Hexakisphosphate and Modify the Abundance of Lower Myo-Inositol Phosphates in Barley (Another great scientific study.)
- How much phytic acid should we eat? Americans typically eat 631-746 mg. People who eat a good diet as advocated by the Weston A. Price Foundation can get away with 400-800 mg.


 [GFDL (http://www.gnu.org/copyleft/fdl.html) or CC BY-SA 3.0 (http://creativecommons.org/licenses/by-sa/3.0)], via Wikimedia Commons")


.jpg)


