• Facebook
  • Instagram
  • Twitter
  • Youtube
  • Pinterest
Embracing Motherhood
  • Teachers Pay Teachers
  • YouTube
  • Blogs
  • Merch
  • Search
  • Menu Menu

Posts

Best Cupcake and Frosting Recipe for Kids

Desserts, General, Recipes

I have made a TON of cupcakes for my little ones and tried many many different variations, and this cupcake recipe is by far the best. I love using it because it works really well with the ingredients that I use regularly like freshly ground whole wheat flour, raw milk, and pastured eggs which are all great things for children to eat! The cream cheese buttercream frosting that I use for these cupcakes is low in sugar and full of flavor, which is also great for kids!

Cupcake Recipe

This recipe will make 24 regular sized cupcakes or 48 mini cupcakes.

Ingredients

  • 1 ½ Sticks Unsalted Butter (room temperature)
  • 1 ½ Cups Sugar
  • 2 Eggs (pastured are best)
  • 2 Teaspoons Vanilla Extract
  • 2 ½ Teaspoons Baking Powder (look for aluminum free)
  •  ¼ Teaspoon Real Salt
  • 2 ½ Cups Flour (I like mine freshly ground, but sprouted flour is the best for eliminating phytic acid if you can afford it.)
  • 1 ¼ Cups Milk (raw milk is best)

Directions

  1. Preheat the oven to 375° F.
  2. Beat the butter, sugar, and egg together until smooth.
  3. Add the vanilla, baking powder, salt, four, and milk. Mix until smooth and creamy.
    Julian Adding Flour to the Cupcakes

    Julian Adding Milk to the Cupcakes

    Julian Mixing Ingredients for the Cupcakes

    Julian Mixing Ingredients for the Cupcakes

  4. Pour into individual baking cups (Sometimes I use baking cups and other times I just spray the pan with some olive oil and go without.) until they are about two-thirds full. I usually like making one pan of regular sized cupcakes and one pan of mini cupcakes.

    Cupcake Batter Poured into Muffin Trays

    Cupcake Batter Poured into Muffin Trays

  5. Bake for 20 minutes or until golden brown.
Cupcakes Baked and Cooling

Cupcakes Baked and Cooling

Cupcakes and Mini Cupcakes

Cupcakes and Mini Cupcakes

Frosting Recipe

This will make enough to frost 24 regular sized cupcakes or 48 mini cupcakes. It’s the perfect consistency when at room temperature, but keep in mind that it will harden quite a bit when refrigerated.

Ingredients

  • 1 Stick Unsalted Butter (room temperature)
  • 1 8 oz Package Cream Cheese (room temperature)
  • 2 Cups Powdered Sugar (You could really even get away with only one cup, just taste it first.)
  • 2 Teaspoons Vanilla Extract
  • *1-2 Teaspoons Milk (wait until the end)
  • *Cocoa Powder, Red Food Coloring and Strawberry Extract (optional)

Directions

  1. Make sure butter and cream cheese are soft to the touch before you get started.
  2. Combine all of the ingredients and mix until smooth and creamy.
    Julian Mixing Ingredients for the Cupcakes

    Ophelia Making the Frosting

    Whipped Frosting

    Whipped Frosting

  3. If you want to thin out the frosting a bit, add one teaspoon of milk at a time until it is the desired consistency.
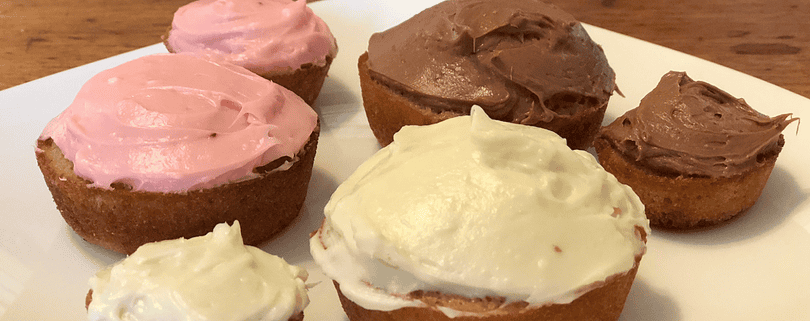
  4. Separate into different bowls to make different flavors. I like to divide mine into thirds and add 1 tablespoon of cocoa powder to make chocolate, a few drops of red food coloring and strawberry extract to make strawberry frosting, and leave one plain vanilla.

    Ophelia Frosting the Cupcakes

    Ophelia Frosting the Cupcakes

  5. Spread the frosting onto the cupcakes once they have fully cooled. You can get fancy by putting the frosting into a little baggie and cutting the tip off to make a cool design or use some frosting tips too.

    Fancy Frosting

    Fancy Frosting

  6. Lightly cover frosted cupcakes with saran wrap and refrigerate.
Frosted Cupcakes

Frosted Cupcakes

In Conclusion

When my kids get a sweet tooth, I’d much rather make something like this from scratch rather than let them have packaged processed food full of many awful and unhealthy ingredients. Yes, they are getting some pure sugar, but they are also getting some really healthy protein and fats as well. Enjoy!

May 5, 2018/0 Comments/by Stacey Maaser
https://embracing-motherhood.com/wp-content/uploads/2018/05/cupcakes.png 400 810 Stacey Maaser https://embracing-motherhood.com/wp-content/uploads/2018/01/EM_Logo.png Stacey Maaser2018-05-05 09:55:162020-11-19 21:05:30Best Cupcake and Frosting Recipe for Kids

Butter is a Superfood!

General, Health, Nutrient Dense Foods
Butter is a Superfood! Embracing Motherhood

I love that as our kids come to HUGE growth spurts, they consume copious amounts of butter. The old me would have cringed at such a thing, but thankfully I’ve read  Nourishing Traditions and discovered Weston Price yet, and I know that butter is a nutrient dense superfood. Here are all of the reasons why butter is a superfood and should be eaten LIBERALLY…especially by growing children and mamas who are pregnant and/or breastfeeding.

Elliot and Ruby Eating Butter

Elliot and Ruby Eating Butter

One stick of butter has 58 grams of saturated fat. This is a good thing! Saturated fats have been demonized by mainstream media, but they are essential for our bodies and especially for growing children. (Read more about why in my blog: The Truth About Fats.)

  • There are certain vitamins that are only soluble in fat, and these include vitamin A, vitamin D, and vitamin K. These fat soluble vitamins occur in LARGE amounts ONLY when the butter comes from cows eating green grass. Vitamins A and D are essential for growth, for healthy bones, for proper development of the brain and nervous system, and for sexual development. The absence of butterfat in growing children results in “nutritional castration” because the male and female sexual characteristics fail to be brought out.
  • The Wulzen Factor also called the “antistiffness factor” is only found in raw animal fat, protects humans from calcification of the joints (degenerative arthritis), hardening of the arteries, cataracts, and calcification of the pineal gland.
  • The Price Factor or Activator X was discovered by Dr. Price and is a powerful catalyst for things like vitamins A and D that help the body absorb and use minerals and can ONLY come from cows eating rapidly growing grass. Dr. Price found that when he gave patients fermented cod liver oil infused with grass-fed butter oil, it practically brought people back from the dead.
  • 12-15% of butter contains short- and medium-chain fatty acids that don’t need to be emulsified by bile salts but can be absorbed directly from the small intestine to the liver where it is converted to quick energy. It also has highly protective lauric acid which is only found in large amounts of coconut oil or small amounts of butterfat.
  • Four carbon butyric acid is unique to butter and has antifungal and antitumor properties.
  • Omega-6 and omega-3 essential fatty acids occur in small but equal amounts in butter.
  • Conjugated linoleic acid (CLA) found in butter has anticancer properties, encourages the buildup of muscle, and prevents weight gain, but only when cows are pasture-fed.
  • The lecithin in butter helps metabolize and assimilate cholesterol and other fats.
  • The cholesterol in butter is needed to produce a variety of steroids that protect against cancer, heart disease, and mental illness.
  • Glycosphingolipids are a type of fat in butter that protects against gastrointestinal infections, especially in the young and elderly. For this reason, children who drink skimmed milk have diarrhea at rates three to five times greater than children who drink whole milk.
  • Trace minerals are incorporated into the fat globule membrane of butterfat including manganese, zinc, chromium, and iodine

Getting butter from grass-fed cows is by far the best. If you have access to raw milk from grass fed cows, the best thing would be to make your own butter or find a local source that sells it. You might be able to find Organic Valley Pasture Butter in season (May-April) at your local grocery store. Kerrygold is imported from Ireland where the cows spend 10 months out of the year on pasture and you can find it online and/or sometimes at your local grocery store. You can also buy organic butter from the store, but it’s expensive and there is no guarantee that the cows were out to pasture.

Sometimes buying healthy food happens in layers and if you’re not to the point of buying expensive butter (I’m not…yet), then know that eating store bought butter isn’t so bad (but you are missing out on some of the amazing health properties). Any hormones or antibiotics that are given to the cows do not get stored in the butterfat, so that’s good at least. Fat soluble poisons such as DDT do accumulate in fats, however. For what it’s worth, we purchase our butter in bulk from Country Life Dairy for $2.75/pound. It is free from rBST bovine growth hormone which makes cows produce an unnatural amount of milk which leads to mastitis, over-use of antibiotics, and a host of other problems. It is actually banned in Canada and European countries.

So now that you know how good butter is, the next question should be: How can I find ways to eat as much butter as possible? My sister recently heard Sally Fallon speak at a conference and she said that vegetables were mostly important because they make excellent vehicles for consuming butter! Personally, I like to lightly steam a head of broccoli, douse it with about a half stick of butter, and then sprinkle it generously with Real Salt. I also like to make organic air popped corn, melt an entire stick of butter to pour over the top, and sprinkle generously with Real Salt for family movie night. Sally Fallon also mentioned that if you are going to have a piece of bread and butter, you should be able to see teeth marks in the butter!

I have started to become creative with how I incorporate butter into our daily lives. I really enjoy my latest idea of melting huge dollops of butter on top of freshly cooked pastured eggs. And even though it is made with sugar, which we all know is the damned devil, I still really enjoy eating cookie dough made with freshly ground grain, two whole sticks of butter, and raw pastured eggs. Mmmmmmm…all this talk about butter is making me hungry! Time for a snack!

For additional reading, check out these articles:

  • Why Butter is Better from the Weston Price website
  • Nutrients in Butter from the Weston Price website
  • Why is Butter Better by Dr. Mercola
January 2, 2018/0 Comments/by Stacey Maaser
https://embracing-motherhood.com/wp-content/uploads/2013/10/butter-is-a-superfood.png 400 810 Stacey Maaser https://embracing-motherhood.com/wp-content/uploads/2018/01/EM_Logo.png Stacey Maaser2018-01-02 02:02:122020-11-19 21:26:37Butter is a Superfood!

How to Make the Best Potato Fries

General, Potatoes, Recipes
Embracing Motherhood How to Make the Best Potato Fries

As a busy mother of four little ones, I love making healthy food that the kids love that fits our budget. These potato fries do all of those things, and this is why I make a big batch of them at least once a week. I try to make enough so that we’ll have extra, but they don’t usually last very long!

Ingredients

  • 6-8 Potatoes (Organic are best, they are one of the dirty dozen!)
  • 2 T. Coconut Oil
  • Real Salt
  • Pepper
  • Optional: Garlic and Onion Powder

Directions

  1. Preheat the Pan: A cast iron skillet would probably be ideal, but for convenience sake, I use a plug in skillet like this. Add coconut oil to the pan and warm it up on a low to medium heat until the oil is nice and hot.
  2. Cut the Potatoes: Wash and cut potatoes. I like to cut mine into strips to make into potato fries, but you could also dice them into little potato cubes or potato circles.

    raw cut up potato fries

    Raw Potatoes Cut Into Fries

  3. Add the Potatoes to the Skillet: When you add the potatoes, the oil should be hot enough to pop.
  4. Cook: Cook with the lid off for about 20-30 minutes on low to medium heat. Flip and stir often. If you leave the skillet uncovered, the fries will be crispier, but take longer to cook. If you cover them, they will cook more quickly, but the fries will be softer.

    potato fries cooking

    Potato Fries Cooking

  5. Season: Add the seasonings of your choice, stir, add a little more, stir, and add a little more. I usually just add a bunch of salt and a dash of pepper.
  6. Serve: My kids like their fries with ketchup of course. For me, I like loading them up like I would a baked potato with cheese, sour cream, and chives. Yum!

    potato fries with ketchup

    Potato Fries with Ketchup

July 3, 2015/0 Comments/by Stacey Maaser
https://embracing-motherhood.com/wp-content/uploads/2015/07/potato-fries.png 400 810 Stacey Maaser https://embracing-motherhood.com/wp-content/uploads/2018/01/EM_Logo.png Stacey Maaser2015-07-03 12:31:552020-11-20 16:16:27How to Make the Best Potato Fries

Homemade Pizza Recipe

General, Pizza, Recipes
Embracing Motherhood Homemade Pizza Recipe

If everyone is hungry and you haven’t made plans for dinner yet, how about a homemade pizza? If you order out, you’re getting freeze dried toppings, loads of “natural flavors” (i.e. MSG), and not to mention you’ll be out $20 or more. By making your pizza at home, you can guarantee that all of your ingredients are fresh, custom designed to the specific needs of your eaters, and at a significant cost savings to boot.

Pizza Crust

  • Sourdough Pizza Crust: If you can plan ahead by about 8 hours or so, this sourdough pizza crust will taste great and be free from the mineral leaching phytic acid present in all grains.
  • Quick and Easy Pizza Crust: If you’re looking for a quick and easy pizza crust that is made with fresh homemade ingredients, this is the recipe for you.

Ingredients

  • Sauce Options:
    • Organic Tomato Sauce: I like finding the little cans that are pre-seasoned with basil and such, but you could use plain tomato sauce and add your own seasonings too.
    • Organic Spaghetti Sauce: I try to keep my cupboards stocked with this and use it if I’m in a pinch.
    • Tomato Pureé: This is  the healthiest option, but it can be a bit watery.
  • Herbs and Spices: Basil, Oregano, Garlic Powder, Onion Powder, and Salt – I like using fresh herbs when I have them, but dried works just as well.) 
  • Mozzarella Cheese (This is the ooey gooey cheese that gives pizza its classic look and taste. You can use just about any cheese and it will taste great though.)
  • Kid Toppings: Pepperoni, Ground Beef, Lunch Meat, Bacon, etc. (My kids really only like meat toppings.)
  • Adult Toppings: Jalapeños, Green Pepper, Onion, Mushrooms, Green or Black Olives, Chives, Tomato, etc.

Directions

  1. Crust: Spread the crust out onto a pizza tray like this or a pizza stone like this. I like using a pizza tray with holes for a nice crispy crust.

    pizza crust

    Pizza Crust

  2. Sauce: If you want to make a pizza that tastes like take out, the trick is to go really really light on the sauce. I prefer it a little thicker though. If I’m using plain tomato sauce, I like to sprinkle some basil, oregano, garlic powder, onion powder, and salt over the sauce. *If I’m feeling really fancy, I like to melt some butter in dish, mix in some herbs and salt, and paint over the outer crust.

    pizza sauce

    Buttered Pizza Crust with Sauce

  3. Season: Add the herbs and spices.

    Homemade Pizza with Herbs and Spices

    Homemade Pizza with Herbs and Spices

  4. Cheese: Add a generous amount of shredded cheese.

    pizza with cheese

    Pizza with Cheese

  5. Toppings: Add any toppings you’d like. Sometimes I’ll go with a plain pepperoni pizza, and sometimes I like to get more creative!
    pepperoni pizza

    Pepperoni Pizza

    Half and Half Pizza

    Half and Half Pizza

  6. Bake: Bake at 450° F for 15-20 minutes. Time will vary based on your oven, altitude, and amount of toppings, but 18 minutes is what usually works best for me.
  7. Cut and Serve: Use a great pizza cutter like this to cut up the pizza into slices and let it cool. You will want to devour this pizza quickly, so make sure it’s had time to cool so you don’t burn the roof of your mouth!

    taking a pizza slice

    Half Pepperoni Pizza

Variations

The thing I like about making pizza is that it’s a hodge podge meal. You don’t have to specifically shop for it, but instead just use whatever ingredients are in your fridge!

Half Lunch Meat Half Veggie Pizza with Cheddar Cheese

Half Lunch Meat Half Veggie Pizza with Cheddar Cheese

Chicken, Feta Cheese, Sharp Cheddar Cheese, Tomato, and Green Olive Pizza

Chicken, Feta Cheese, Sharp Cheddar Cheese, Tomato, and Green Olive Pizza

Rectangle Pepperoni Pizza

Rectangle Pepperoni Pizza

June 24, 2015/0 Comments/by Stacey Maaser
https://embracing-motherhood.com/wp-content/uploads/2015/12/pizza-slice.png 400 810 Stacey Maaser https://embracing-motherhood.com/wp-content/uploads/2018/01/EM_Logo.png Stacey Maaser2015-06-24 08:44:232020-11-20 16:24:19Homemade Pizza Recipe

Pizza Toast: Your Kids’ New Favorite Food

General, Pizza, Recipes
embracing motherhood Pizza Toast: Your Kids' New Favorite Food

When my sister Lisa was visiting recently from Oklahoma, I loved seeing how much my little two year old nephew Tristan loved his “pizza toast”, and it inspired me to make some pizza toast of my own! I went on a little pancake binge not too long ago and created every conceivable recipe for pancakes that I could imagine (I have since created several more, but I’m sick of writing recipes for pancakes!) Well, now I feel like everything is coming up pizza these days! And why not? Kids love pizza, it’s a great way to incorporate a mixture of foods and flavors, and there are many different ways to make it if you’re feeling creative!

Ingredients

  • Sourdough Muffins (or whatever kind of bread you have or like to use)
  • Butter
  • Organic Tomato Sauce (glass jars are best, but we make do)
  • Herbs and Spices (basil, oregano, garlic powder, and salt)
  • Mozzarella Cheese (shredded, or any cheese you like or have around)
  • Toppings (pepperoni, ground hamburger, lunch meat, green pepper, tomato, green olives, etc.)

Directions

  1. Cut the sourdough muffins in half and top generously with butter. (I like putting my salt and garlic powder on at this point, but it can go on top of the sauce too.)

    Sourdough Muffins Topped with Butter, Garlic Powder, and Salt

    Sourdough Muffins Topped with Butter, Garlic Powder, and Salt

  2. Place a spoonful of tomato sauce on top of each muffin and spread using the back of the spoon.

    Sourdough Muffins Topped with Tomato Sauce

    Sourdough Muffins Topped with Tomato Sauce

  3. Top with herbs and spices.
  4. Sprinkle generously with cheese.

    Sourdough Muffins Topped with Mozzarella Cheese

    Sourdough Muffins Topped with Mozzarella Cheese

  5. Add any desired toppings.
  6. Pop in the toaster oven for 10 minutes (or until the bread is toasted and the cheese is melted and bubbly).

    Pizza Toast with Pepperoni

    Pizza Toast with Pepperoni

  7. Use a pizza cutter to cut into little pieces. (My kids always like eating bite sized things.)

    Pizza Toast Cut Up Into Bite Sized Pieces

    Pizza Toast Cut Up Into Bite Sized Pieces

June 24, 2015/0 Comments/by Stacey Maaser
https://embracing-motherhood.com/wp-content/uploads/2015/06/pizza-toast-cut-up.png 400 810 Stacey Maaser https://embracing-motherhood.com/wp-content/uploads/2018/01/EM_Logo.png Stacey Maaser2015-06-24 07:37:032020-11-20 16:25:21Pizza Toast: Your Kids’ New Favorite Food

Easy Meatball Recipe Served with Spaghetti or Stroganoff Sauce

Beef, General, Recipes
Easy Meatball Recipe

This simple and easy recipe will yield some amazingly versatile and delicious meatballs that will be a big hit with everyone! You can enjoy them plain, top them with spaghetti sauce for a traditional Italian feast, or smother them with a white stroganoff sauce, and then serve any of these options over a bed of noodles. Any variation will be sure to please!

I made this recipe for my daughter Ophelia’s 2nd birthday, and they were a big hit! I wanted to make something healthy that both the kids and the adults would enjoy, and this was the perfect meal. I love serving meatballs at a party because you can keep them warm in a crock pot so that any stragglers or late eaters will be ensured a tasty meal.

Ingredients

  • 1 lb Ground Beef (Grass-Fed)
  • ½ c. Milk (Raw)
  • 1 c. Organic Rolled Oats (Not quick or instant)
  • 1 Egg (Pastured)
  • 1 t. Real Salt (Get some here.)
  • ½ t. Pepper
  • 1 t. Onion Powder
  • 1 t. Garlic Powder
  • 1 t. Ground Oregano
  • 1 t. Ground Basil
  • 1 T. Bragg Liquid Aminos

Directions

  1. Preheat the oven to 350° F.
  2. In a large bowl, mix together all of the ingredients. I like to add everything but the meat first, mix it together really well, and then add the meat and knead it in. *When I add my seasonings, I never measure, I just sprinkle them in. When I add this seasoning mixture to meat, like my taco meat recipe, I always add so much that I think, “Was that too much?”, but it never is.

    Meatball Mixture

    Meatball Mixture

  3. Form the meat mixture into balls. I really had fun using this small cookie scoop, and it was much easier than forming individual meatballs by hand!
  4. Place onto a greased cookie sheet. (You should be able to fit them all on one. I didn’t grease my cookie sheet the first time I made these, and the pan was quite hard to clean afterwards. It also helps to keep them on the middle rack in the oven.)

    Meatballs Ready to Bake

    Meatballs Ready to Bake

  5. Bake them at 350° F for 20 minutes. (You want them to be browned on the outside, so you may need to go 25 minutes depending on your oven.)

    Cooked Meatballs

    Cooked Meatballs

Spaghetti Sauce Meatballs

You can just dump a can of store bought spaghetti sauce on these meatballs, and they would be just great! Or, you can make things a little fancier by mixing some of my Tomato Puree with some organic store bought spaghetti sauce. I like to put my meatballs into a crock pot and let it simmer on low for a few hours before serving so that the they have time to soak up the flavor of the sauce.

Meatballs in Spaghetti Sauce

Meatballs in Spaghetti Sauce

Stroganoff Sauce Meatballs

Just mix together 1 can of cream of mushroom soup, ½ cup of sour cream, some parsley, onion powder, garlic powder, and salt and pepper to taste for a simple and easy stroganoff sauce. Mix the sauce and meatballs together and place in a crock pot on low one hour before serving time to let the meatballs really soak up the stroganoff flavor.

Meatballs in Stroganoff Sauce

Meatballs in Stroganoff Sauce

Serve with Noodles

I personally love angel hair pasta, but my kids really like rotini noodles. Egg noodles are typically served with stroganoff, so that’s a good option too. If you’re trying to lose weight, you might want to skip the noodles, but I think they add such a yummy flavor and texture, that it’s worth it to at least have a little bit!

Angel Hair Pasta

Angel Hair Pasta

Protein Enhanced Rotini Noodles

Protein Enhanced Rotini Noodles

Serve with Salad

The meal just wouldn’t be complete without a big tossed salad. I also created an Olive Garden salad dressing to accompany it, and it was amazing!

Tossed Salad

Tossed Salad

Big Hit

This meal really pleased everyone, adults and children alike! I also served a big plate of deviled eggs, some lemon/apple cider vinegar water, and raw milk. My parents (who raised five children, now all grown and moved out of the house) passed on to us their giant table with three leaves and their beautiful china set. It was really fun for me to prepare this meal and set a fancy table for those that we love. The meal was delicious, but even better was the company that surrounded us as we enjoyed it. There is such a joy in cooking a good healthy meal and enjoying it with those that you love!

Ophelia's Birthday Meal

Ophelia’s Birthday Meal

May 22, 2015/0 Comments/by Stacey Maaser
https://embracing-motherhood.com/wp-content/uploads/2015/05/meatballs.png 400 810 Stacey Maaser https://embracing-motherhood.com/wp-content/uploads/2018/01/EM_Logo.png Stacey Maaser2015-05-22 21:47:112020-11-20 16:44:26Easy Meatball Recipe Served with Spaghetti or Stroganoff Sauce

Whole Wheat Pancakes or Waffles

General, Grain, Recipes

I love making these whole wheat pancakes or waffles when we need a quick meal and I don’t have the time to wait for my Sourdough Waffle and Pancake Recipe or my Sort of Sourdough Pancake Recipe. I like this recipe because it has the most eggs and least amount of flour of any of my waffle or pancake recipes. Yes, it will have phytic acid, but as long as it’s just sometimes and not all the time. The kids love helping me with this recipe.

Ingredients

  • 2. c. Milk (Raw is best.)
  • 3 ½ c. Flour (I get my wheat berries here, but you can find some similar here too. I use this grinder. You could also just buy some organic sprouted grain flour here.)
  • 4 Eggs (Preferably pastured)
  • 2 T. Cinnamon (Buy some here.)
  • 2 T. Vanilla Extract (This vanilla would be best, but on our budget, I buy this.)
  • ½ t. Real Salt (I buy my Real Salt in bulk here, you can buy a shaker here, or a refill pouch here.)
  • 1 t. Baking Soda  (or Aluminum Free Baking Powder)
  • 2 T. Coconut Oil (This coconut oil would be best, but on our budget, I buy this.)

Directions

  1. Preheat your cast iron skillet (make sure it’s cured properly) by setting it to a 2 or 3 for about five minutes.
  2. Add a dollop of coconut oil to your cast iron skillet (or whatever cooking pan you choose).
  3. Mix the eggs. It definitely is a good idea to have some help with this! Ruby knows how to puncture each egg yolk and stir them up.

    child cracking eggs into a bowl

    Ruby is Really Good at Cracking Eggs

  4. Add the cinnamon, vanilla, salt, and baking soda. Stir well.
  5. Add the flour and mix together. (Add a little at a time and mix well to avoid lumps. To make a thinner mixture, use 3 cups of flour, and to make a thicker mixture use 4 cups of flour.)
  6. Turn the heat dial to 4 and pour a ladle’s worth of batter into the skillet. (The oil should be bubbling around the pancake.) *If you’re making waffles, go ahead and add the batter to the waffle iron. I like to grease mine with coconut oil.

    whole wheat pancake batter just starting to cook on a cast iron skillet

    Whole Wheat Pancake Batter Starting to Cook

  7. Cover and let cook for about 2-4 minutes. (By the time I get a few pancakes in, the heat is sometimes too high and needs to be turned down temporarily. You’ll know if the heat is too high if you get hit with splattering coconut oil!)
  8. When the edges are slightly browned and the top is bubbly, you’ll know it’s time to flip. (Stand back as you do this so you don’t get hit with splattering coconut oil.)

    whole wheat pancake cooking in a cast iron skillet

    Whole Wheat Pancake Cooking

  9. Cover and cook for about 1 minute on the other side.

    whole wheat pancake cooking in a cast iron skillet

    Whole Wheat Pancake Cooking

  10. Cook the rest of pancakes and add more coconut oil as needed. When you rock the pan back and forth, there should be enough oil to generously coat the bottom. This batter should make about 5-6 pancakes.
  11. Serve with butter and maple syrup. (I like to smear the butter all over the top, then cut it up, and finally add a very modest amount of syrup.)
    whole wheat pancake topped with butter and syrup ready to eat on a plate

    Whole Wheat Pancake Topped with Butter and Syrup

    child eating whole wheat pancakes for breakfast with a glass of milk

    Elliot Loves these Whole Wheat Pancakes!

April 10, 2015/0 Comments/by Stacey Maaser
https://embracing-motherhood.com/wp-content/uploads/2015/04/embracing-motherhood.com-18.png 400 810 Stacey Maaser https://embracing-motherhood.com/wp-content/uploads/2018/01/EM_Logo.png Stacey Maaser2015-04-10 12:48:102020-11-20 18:30:38Whole Wheat Pancakes or Waffles

How to Make the Best Baked Salmon

Fish, General, Recipes
baked salmon with lemon juice, olive oil, salt, pepper, and dill baked

Salmon is a nutrient dense food that we like to eat about once a week. Stay away from farm-raised salmon that are fed soy meal and given a chemical to make their flesh pink. Wild caught salmon are rich in 18-carbon omega-3 linolenic acid that protects us against heart disease, high blood pressure, strokes, cancer, arthritis, psoriasis, asthma, and autoimmune disorders. It is also rich in the longer chain fatty acids like EPA and DHA that are necessary for proper function of the brain and eyes (and are especially beneficial in the diet of pregnant women and growing children). Salmon is also an excellent source of vitamin D and contains vitamin A and E, iron, iodine, and the B vitamins. (Information from Sally Fallon’s Book Nourishing Traditions p. 418)

Ingredients/Materials

  • Wild Caught Salmon (We buy ours at our local grocery store for $10 for 16 oz.)
  • ¼ c. Extra Virgin Olive Oil
  • 1 Lemon
  • ½ t. Dill
  • 1 t. Real Salt (I buy my Real Salt in bulk here. You can buy a shaker here, or a refill pouch here.)
  • ½ t. Pepper
  • Glass Pan (Buy one here.)
  • Lemon Press (Buy one here.)
    salt, pepper, dill, lemon, and extra virgin olive oil to bake wild caught salmon

    Everything You Need to Bake Your Wild Caught Salmon

    wild caught salmon, broccoli, and rice

    Everything You’ll Need to Turn this into a Great Dinner

Directions

  • Preheat the Oven: Preheat the oven to 425˚F.
  • Salmon: Arrange the salmon in the glass pan. I usually need to cut the tail off in order to make it fit. (I like using my kitchen scissors for this.)

    raw wild caught salmon cut to fit in a glass pan with nothing on it

    Wild Caught Salmon Cut to Fit in a Glass Pan

  • Lemon: Use the lemon press to squeeze the juice of one lemon all over the salmon.

    IMG_8657

    Squeezing Lemon Over Wild Caught Salmon

  • Extra Virgin Olive Oil: Drizzle the olive oil generously on top of the salmon.

    IMG_8661

    Pouring Extra Virgin Olive Oil Over Wild Caught Salmon

  • Spices: Sprinkle generous amounts of dill, salt, and pepper all over the salmon.

    IMG_8664

    Sprinkle Salt, Pepper, and Dill onto the Salmon

  • Bake: Bake at 425˚F for 10 minutes. The fish should flake apart with a fork when done.

    baked wild caught salmon with lemon, extra virgin olive oil, salt, pepper, and dill

    Baked Wild Caught Salmon

  • Enjoy: Serve with rice and broccoli for a complete and delicious meal. Our kids love salmon. It is one of their favorite dinners.

    young child eating a salmon dinner with rice and broccoli

    Elliot Loves Salmon!

April 6, 2015/0 Comments/by Stacey Maaser
https://embracing-motherhood.com/wp-content/uploads/2015/04/embracing-motherhood.com-14.png 400 810 Stacey Maaser https://embracing-motherhood.com/wp-content/uploads/2018/01/EM_Logo.png Stacey Maaser2015-04-06 12:53:162020-11-20 18:37:24How to Make the Best Baked Salmon

Sort of Sourdough Pancakes

General, Grain, Recipes

Typically, when you make things with sourdough, you need to prepare them well in advance, but what if you wake up one Sunday morning and you’re just craving pancakes? This is a good recipe to make some quick pancakes that are “sort of sourdough”. (If you’re looking for more of a real deal sourdough waffle/pancake recipe, check this recipe out, and if you just want some whole wheat pancakes, go here.) My kids always love this pancake recipe, and we sometimes even eat them for dinner!

Read my article about phytic acid if you want to learn why eating sourdough is so important!

Ingredients

  • 1 c. Sourdough Starter
  • 2. c. Milk (Raw is best.)
  • 2 c. Flour (I get my wheat berries here, but you can find some similar here too. I use this grinder. You could also just buy some organic sprouted grain flour here.)
  • 3 Eggs (Preferably pastured)
  • 6 T. (¾ stick) Melted Butter (You can add room temperature butter and it should mix alright though.)
  • 2 T. Cinnamon (Buy some here.)
  • 2 T. Vanilla Extract (This vanilla would be best, but on our budget, I buy this.)
  • ½ t. Real Salt (I buy my Real Salt in bulk here, you can buy a shaker here, or a refill pouch here.)
  • 1 t. Baking Soda (or Aluminum Free Baking Powder)
  • 2 T. Coconut Oil (This coconut oil would be best, but on our budget, I buy this.)

Directions

  1. Mix the sourdough starter and milk. Try to let it sit out for as long as you can. If you let it sit out for 8 hours, all of the phytic acid will be broken down, but if you can at least let it sit out for half an hour to an hour it will be better than nothing. (*Eating sourdough is an acquired taste. It might be a good idea to slowly get your family used to the sour taste of these pancakes by letting the batter sit out for increasing amounts of time.)
  2. Preheat your cast iron skillet (make sure it’s cured properly) by setting it to a 2 or 3 for about five minutes.
  3. Add a dollop of coconut oil to your cast iron skillet (or whatever cooking pan you choose).
  4. In a separate bowl, mix the eggs.
  5. Add the cinnamon, vanilla, salt, and baking soda. Stir well.
  6. Add the flour and mix together. Add about a ½ c. to a cup more flour if you like poofier pancakes. This mixture is pretty thin, but it makes some deliciously thin pancakes that we all love. (*I find that my kids really like it when I cook pancakes one way for awhile, that I mix it up and make it a little different. So I’ll go from thick to thin and less sour to more sour quite often.)

    sourdough pancake batter mixed up and ready to serve with a ladle

    Sort of Sourdough Batter

  7. Turn the heat dial to 4 and pour a ladle’s worth of batter into the skillet. (The oil should be bubbling around the pancake.)

    sort of sourdough batter just starting to cook on a cast iron skillet

    Sort of Sourdough Batter Starting to Cook

  8. Cover and let cook for about 2-4 minutes.  (By the time I get a few pancakes in, the heat is sometimes too high and needs to be turned down temporarily. You’ll know if the heat is too high if you get hit with splattering coconut oil!)
  9. When the edges are slightly browned and the top is bubbly, you’ll know it’s time to flip.  (Stand back as you do this so you don’t get hit with splattering coconut oil.)

    Sort of sourdough pancake with brown edges and bubbling on top ready to flip

    Sort of Sourdough Pancake Ready to Flip

  10. Cover and cook for about 1 minute on the other side.

    sort of sourdough pancake cooking in a cast iron skillet

    Sort of Sourdough Pancake Almost Done Cooking

  11. Cook the rest of pancakes and add more coconut oil as needed. When you rock the pan back and forth, there should be enough oil to generously coat the bottom. This batter should make about 5-6 pancakes.
  12. Serve with butter and maple syrup. (I like to smear the butter all over the top, then cut it up, and finally add a very modest amount of syrup.)
    sourdough pancake fully cooked with a dollop of butter on the top

    Sort of Sourdough Pancake

    cut up sourdough pancake with butter and syrup ready to eat on a plate

    Sort of Sourdough Pancake Cut Up and Ready to Eat

April 5, 2015/0 Comments/by Stacey Maaser
https://embracing-motherhood.com/wp-content/uploads/2015/04/Untitled-design-10.png 400 810 Stacey Maaser https://embracing-motherhood.com/wp-content/uploads/2018/01/EM_Logo.png Stacey Maaser2015-04-05 21:49:392020-11-20 18:38:48Sort of Sourdough Pancakes

How to Make the Perfect Fried Egg

Eggs, General, Recipes
fried eggs cooked in a cast iron skillet

There are so many different types of egg dishes to consider making, but my each of my four kids have gone through a phase when one of their favorite foods was a perfectly cooked fried egg. Just like all of my other egg recipes, this one is simple and easy to follow, and will soon become a family favorite in your home too.

Ingredients

  • 3-4 Eggs (Preferably Pastured)
  • 1 T. Coconut Oil
  • ½ t. Salt (I buy my Real Salt in bulk here. You can buy a shaker here, or a refill pouch here.)
  • ¼ t. Pepper
  • 1 T. Butter
  • ½ c. Cheese (Optional)

Directions

  1. Cure the Cast Iron Skillet: If you’re using a cast iron skillet, which I recommend, then you’ll want to make sure it’s cured properly before beginning.
  2. Coconut Oil: Plop in a dollop of coconut oil and let the pan warm up for a good 3-5 minutes on a low setting. (This helps to ensure that the skillet is properly cured even more.)

    Coconut oil melting on a cast iron skillet

    Coconut Oil Melting on a Cast Iron Skillet

  3. Turn Up the Heat: Turn the heat up to a 3 or 4 and if you have the patience, let it heat up for another few minutes.
  4. Crack the Eggs: I usually like to cook three or four eggs at a time.

    fried eggs just starting to cook in a cast iron skillet

    Fried Eggs Just Hit the Cast Iron Skillet

  5. Break the Yolks: Puncture the yolks by making an X in them with the spatula. (Don’t get too crazy here, you want the white and yellow parts of the egg to stay somewhat separate.)
    fried eggs halfway cooked with yolks broken

    Fried Eggs with Broken Yolks


  6. Cover and Cook: Cover the pan with a lid and cook on a 3 for about 8 minutes. Check the eggs after about 4 minutes. If they’re not really cooking yet, turn it up a bit. If the oil is bubbling and the eggs are cooking too fast, turn it down.)

    Fried eggs covered and cooking.

    Fried Eggs Covered and Cooking

  7. Flip: Once the eggs are cooked almost all the way through, it’s time to flip.
    fried eggs ready to flip in a cast iron skillet

    Fried Eggs Ready to Flip

    fried eggs cooked and flipped in a cast iron skillet

    Fried Eggs Flipped

  8. Cheese: If you want cheese, add it now. Either shredded or sliced will work just fine.
  9. Cover and Turn Off the Heat: Let the eggs finish cooking for a minute or two, or wait until the cheese melts.

    cooked fried eggs with melted cheese in a cast iron skillet

    Fried Eggs with Cheese

  10. Serve: If I’m serving the eggs plain without any cheese, I like to add a large pat of butter. Then I cut the eggs up into bite size pieces and serve. These eggs also work really well in egg sandwiches.
    cooked fried eggs with melted cheese and bacon on a plate

    Cooked Fried Eggs with Cheese Served with Bacon

    One Egg with Melted Cheese Cut Up and Ready to Eat!

    One Egg with Melted Cheese Cut Up and Ready to Eat!

March 31, 2015/0 Comments/by Stacey Maaser
https://embracing-motherhood.com/wp-content/uploads/2015/04/Untitled-design-8.png 400 810 Stacey Maaser https://embracing-motherhood.com/wp-content/uploads/2018/01/EM_Logo.png Stacey Maaser2015-03-31 12:23:282020-11-20 18:42:21How to Make the Perfect Fried Egg
Page 1 of 212

Search

Stacey Maaser

Stacey Maaser author of Embracing Motherhood

Author of Embracing Motherhood

Affiliate Links

I participate in the Amazon Services LLC Associates Program, which is an affiliate advertising program. As an Amazon Associate I earn from qualifying purchases.

Recent Posts

  • Teach Your Toddler How to Read
  • Teach Your Baby How to Read
  • We Use Our Trampoline Just About Every Day!
  • How to Start a Homeschool Routine During Covid-19
  • 26 Learning Centers for a Homeschool Preschool Environment
  • How to Make Whole Wheat Sourdough Muffins
  • #1-Oral Language Development Lays the Foundation for Reading
  • #2-How to Engage Your Baby or Young Child with Reading
  • #3-Learning How to Read Begins with the ABCs
  • #4-Memorizing Words (Before Sounding Them Out) Leads to Reading

Newsletter Signup

TEACHING    PARENTING    MOM TALK    HEALTH    RECIPES    DIY  

The information on this website has not been evaluated by the FDA and is not intended to diagnose, treat, prevent, or cure any disease. By accessing or using this website, you agree to abide by the Terms of Service, Full Disclaimer, Privacy Policy, Affiliate Disclosure, and Comment Policy. Content may not be reproduced in any form.

Terms of Service | Full Disclaimer | Affiliate Disclosure | Comment Policy | Privacy Policy

Copyright © 2023 Embracing Motherhood. All rights reserved. Site by CurlyHost.
  • Facebook
  • Instagram
  • Twitter
  • Youtube
  • Pinterest
Scroll to top
 

Loading Comments...